
Note: This article is written from the perspective of a user in Taiwan. I’m not sure how the experience may differ in other countries outside of Taiwan or Japan.
Recently, I needed a Japanese phone number that could receive SMS for logging into PIA and eplus ticketing websites.
After doing some research, I chose ifmobile instead of Hanacell or Rakuten's resold SIM cards. This post documents the purchase process and my experience using it—hopefully helpful for those with similar needs.
Why I Chose ifmobile
Although ifmobile is a Chinese-owned company (which may raise privacy concerns for some), I decided to try it out due to several practical advantages:
- The most important reason:
Hanacell requires you to physically be in Japan to use the number—so while it’s cheaper, it’s not usable immediately.
According to users on Plurk, Rakuten-based SIMs can no longer be used for PIA or eplus phone call verification as of 2025. - Like Hanacell, ifmobile supports both physical SIM and eSIM (eSIM must be requested through customer support).
- You can purchase directly on ifmobile’s website using a credit card.
- The signup process only requires a photo of you holding your passport (ID page).
- Customer service is responsive—even during Japan’s Golden Week holidays.
- Once the number is activated, you can receive SMS or make calls right away—Japanese website verification (PIA, eplus, LINE) works without issues.
Some online posts suggest you have to wait 30 minutes after roaming is activated via support—but in my case, and confirmed with their staff, it worked immediately with no need for manual activation.
Signup Process and Customer Support
Here’s a quick overview of how I signed up:
-
Fill in your info on their website. Japanese name doesn't have to match precisely (stroke count can differ), but your English name should match your passport.
-
Use your English address, and list your nationality as “Taiwan” (no need to write "ROC").
-
Upload a selfie with your passport and a clear photo of the ID page. The background doesn’t need to be professional—as long as your face is visible and you’re not wearing a mask, it’s fine.
-
Make the payment (first-month fee + ¥5,500 activation fee).
-
You must manually contact customer service (WeChat recommended—they reply much faster than LINE). You can request an eSIM and get a refund for the shipping fee.
During Golden Week, I contacted them via LINE on Wednesday (4/30) and only got a reply on Saturday (5/03).
Meanwhile, I messaged them on WeChat the same Wednesday and received a reply that day, plus follow-up help on Saturday (5/03). -
Shipping is via EMS. International shipping costs ¥2,200.
Note: Each time you transfer the eSIM to a new phone, there’s a ¥1,100 re-issue fee.
Customer service sometimes replies with voice messages, almost like a casual WeChat voice chat. I’m not sure if it’s just personal preference or situational, but it feels pretty chill . Still, they were helpful and resolved my questions quickly.
Shipping Speed
Here's how it went for me:
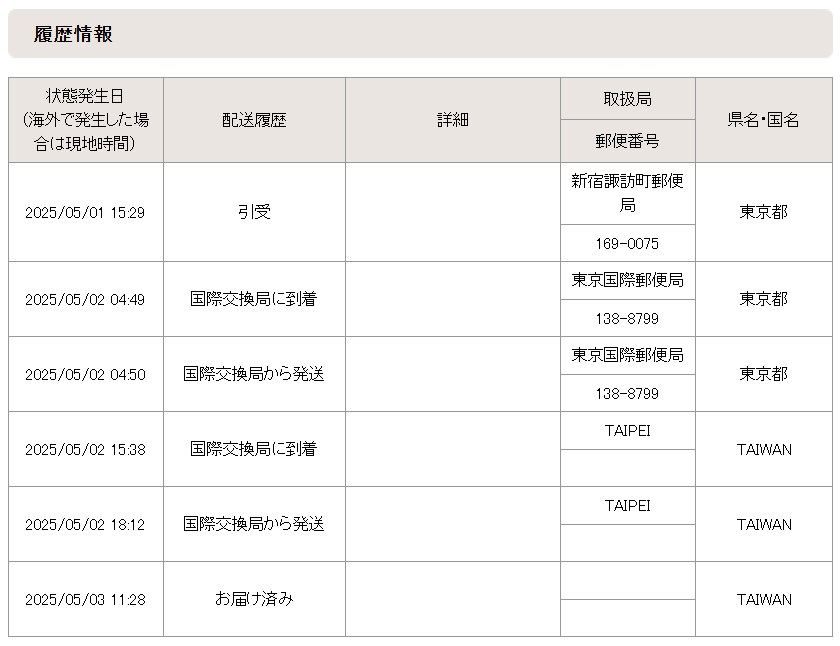
- April 30: I placed the order and inquired.
- May 1: Shipped in the afternoon (you'll need to ask support for the EMS tracking number manually).
- May 2 (morning): Arrived at Tokyo International Exchange Center.
- May 2 (afternoon): Arrived in Taiwan.
- May 3 (11 AM): Delivered to my home in Taipei (I requested afternoon delivery, but the courier called and delivered it earlier).
For international shipping from Japan to Taiwan, I’d say that’s impressively fast.
Cost Breakdown
Monthly plans vary based on the amount of data you choose. Here's a basic fee overview:
- Activation Fee: ¥5,500
- Emergency call service (110/119/120): ¥4/month
- Incoming SMS while abroad: Free
- Sending SMS while abroad: ¥220/message
- Domestic Japan calls: ¥24/30 sec
- Calls from Japan to overseas: ¥275/30 sec
- Calls made/received abroad: ¥275/30 sec
- eSIM transfer (each time): ¥1,100
- International shipping: ¥2,200 (Domestic Japan shipping: ¥880)
I chose the 1GB/month plan with no additional voice package.
Real-World Usage Tests
The SIM arrived in a large Japanese EMS envelope and included a physical SIM and a Japanese-language instruction sheet.
Tested devices:
- ASUS Zenfone 8: Could receive SMS, but VoLTE couldn’t be enabled → couldn’t make calls.
- Apple iPhone 6s (2017): No signal—might be a device-specific issue.
- Apple iPhone 6+ (2015): Connected to Chunghwa Telecom with full bars right after reboot. Could call Japan/Taiwan and receive/send SMS without issue.
You don’t need to configure APN or install profiles when using it in Taiwan—those are only necessary when you’re in Japan.
Bonus: Ticket Site Verification
-
Successfully passed PIA and eplus concert site phone verification.
Reminder: When dialing from Taiwan, drop the initial "0" and use Japan’s country code +81.
- Japanese LINE account binding worked.
However, LINE age verification still requires a personal visit to the ifmobile office in Tokyo, so you can’t use the LINE ID search feature—only QR code invites will work for now.
Final Thoughts: Is it Worth It?
If you’re just looking for a cheap number to keep long-term ("number parking"), ifmobile isn’t the most cost-effective choice.
But if you need a quick setup, easy application, responsive support, and a number that can receive SMS and make calls, then ifmobile is a lifesaver—especially if you're in a rush for something like PIA or eplus authentication.
For me, getting everything set up within a week and being able to choose between eSIM and physical SIM made it absolutely worth it. The only real downside is the price.
If you’re not in a rush, can physically go to Japan, or don’t need last-minute login verification, then Hanacell is probably the better (and much cheaper) choice.
So if you need a Japanese number for receiving SMS or binding Japanese LINE, consider giving ifmobile a try!